
Instructions, Care and Maintenance
Instructions Care and Maintenance PDF Click Here
Looking after your base PDF
To download right click link above and select "Save Target as".
Although it is manufactured from highest quality materials any metal will eventually corrode if exposed to a harsh environment.
Salt air and damp is your worst enemy so store your vice in a cool dry place.
The jaws should occasionally be wiped with a dry cloth and a small amount of sewing machine oil. Especially before prolonged storage.
Wipe the rest of the vice down with the same soft cloth. The little excess oil from the jaws will do no harm.
The wooden base is treated with Woodock 10 interior wood sealer and should be maintained with Woodock Penetrating Furniture Wax or any other good quality furniture wax.
Operating Instructions
Base
When you receive your Jvice it is packed in transport mode. Turn the Cam lever till it is parallel to the main stem. This loosens the vice stem which can now be removed.
• To use the vice direct onto the base.

• Insert the brass cam into the 15mm hole on the left side of the base with the SS lever pointing upward. Now insert the vice stem into the 10mm hole on top of the base. Push the SS lever away from you to lock the stem in the required position. (do not use excessive force)
• The vice when in this mode can be comfortably used on ones lap when no Table is available.
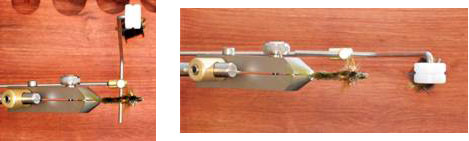
Extension Arm
•The extension arm is very useful when tying at a table which is a bit too high for comfort.
•Insert the Brass Cam into the base with the lever pointing away from you.
• Now insert the extension arm into the 10 mm hole on the front edge of the base. (note you may have to lift the cam slightly to get the ext arm in)
• Get the hex nut to engage with the SS plate on the front edge of the vice and secure the arm by moving the cam lever to the left.
• Insert the stem of the vice into the ext arm body, position at the desired height and secure by tightening the thumb screw on the ext arm.
• If the vice stem is not vertical. Loosen the SS wood screw which holds the hex plate. Get the stem in the vertical position and tighten the screw.
Hook Clamping
• Adjust the clamping lever on the jaw so it points down. Open the set screw on the back side of the jaw and place the hook into the jaw as shown. (Try and align the hook shank along the centre line of rotation.) Finger tighten the set screw.
• Raise the clamping cam lever back and up till the hook is tight. Test the hook to see that it is secure. If not release the jaw cam lever and tighten the set screw a small amount.
• NB! Avoid over tightening the hook as the hook as well as the jaws can be damaged. This is especially true for very small hooks held right in the tips of the jaw.
Hook Height Adjustment
• To achieve the correct clamping with the hook shank along the centre line of rotation it may be necessary to adjust the jaw height.
• Loosen the grub screw A in the jaw adaptor with allen key provided and slide the jaw up or down the GooseNeck 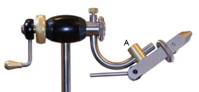 shaft to achieve the correct hook height. Then tighten the grub screw.
Rotation
• The vice main shaft is rotated using the crank handle. First loosen the large brass thumb wheel with your thumb. (push upward with thumb) then rotate the jaws to required position.
• To keep the jaw in this position tighten the brass thumb screw. (downward with thumb)
• The thumb screw has a very fine thread and can also be adjusted to maintain an even pressure allowing the jaws to be rotated and stay in any fixed position without readjusting the thumb wheel.
Bobbin Rest
Insert the Bobbin rest into the 3 mm hole on the adaptor on the vice stem and secure with the thumb screws in the desired position.
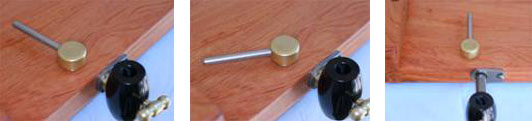
Storage
• Hook the bobbin rest into the base around the set screw in the top left of the base with the white nylon bush in the 15 mm hole on left edge of base.
• Place the waste basket on top of the base. (this gives the base some degree of protection from the vice when in travel mode).
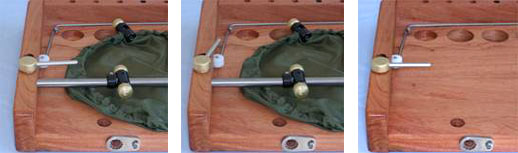
• Insert the brass cam into the 15 mm hole on top of the left side of the base with the lever to the right.
• Lay the vice on the base and insert the stem into the 10 mm hole on left side of base.
• Secure by pushing the lever away from you toward the back of the vice base.
Accessories
Midge Jaws
• When storing the midge jaws should always be left in the open position shown below.
• Place the hook between the jaws as shown and push the cam lever forward until it locks into place.
• When releasing the hook please be careful as the lever may spring back.
• When the jaws are new it may be necessary to push the jaws together at the back to completely loosen the hook or to insert a larger size hook.
• Be careful not to use hooks that are too large as the jaws may break or loose their spring tension. These jaws are designed for hooks #16 and smaller although larger hooks can be held successfully.
Articulating Bobbin
• After securing the hook in the Jaws, Insert the Bobbin rest into the 3 mm hole on the adaptor on the vice stem.
• Turn the articulating bobbin to 90 deg away from you as shown in the first picture below. Now loosen the thumbscrew on the bobbin housing on the vice stem and adjust so that the bobbin is just behind the hook eye as shown in the first picture below. Tighten the thumb screw.
• The small thumb screw at the point of articulation can be loosened and the distance from the bobbin to the hook adjusted to suit your needs.
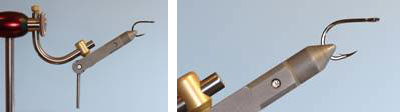
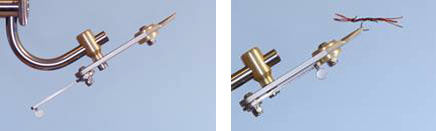
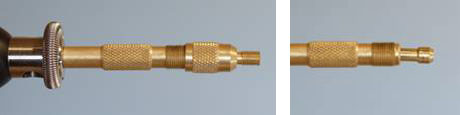
Tube Fly Attachment
• Remove the small thumbscrew from the top of the GooseNeck. Then using the 3mm allen key provided remove the 6mm grub screw from the front of the main shaft.
• Carefully remove the GooseNeck.
• Screw the main body of the Tube Fly attachment into the front of the main shaft.
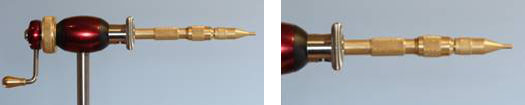
• Slide the required tube onto the mandrel (Pin) and feed into the nosecone of the attachment. (make sure the collet housing is lose).

• Push the mandrel all the way back and tighten both the collet housing and the nose cone.
• The collet housing clamps the pin when it is tightened.
• Now unscrew the nose cone. As it unscrews it clamps the tube between the end of the mandrel and the nose cone.
• Start tying your tube fly.
• To change collets and nose cone for another size.
• Screw off the nose cone and remove the collet housing.
• Take out the collet and replace with the new size.
• Re assemble using the matching nose cone and mandrel (pin).
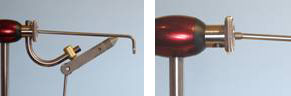
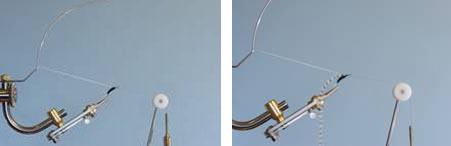
Gallows Attachment
• The main use is when tying paraloop and parachute type flies.
• Attach the gallows to the top of the GooseNeck and secure with the small brass thumb screw.
• When tying in the loop work from the kink in the gallows attachment forward to the tie in position on the hook as shown below. (Slip the loop around to the vertical position and check that it is taut. If not either move the gallows forward and shorten the loop or bend the gallows upward slightly.)
• Then tie in the hackle at the same point. Now slip the loop around to the vertical position.
• Wrap the hackle in tight turns up the loop until the desired length is achieved and then back down to the hook.
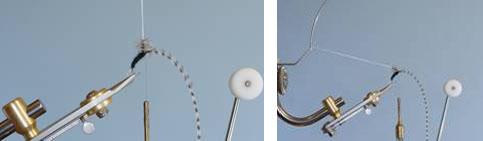
• Slip the loop back to the kink and tie off the hackle.
• With the loop in this position and the hackle held out of the way dub the thorax.
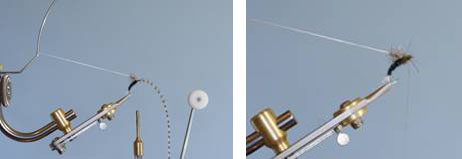
• Now pull the loop off the gallows and fold forward over the thorax and tie off.

• Form a neat thread head, whip finish and cement.
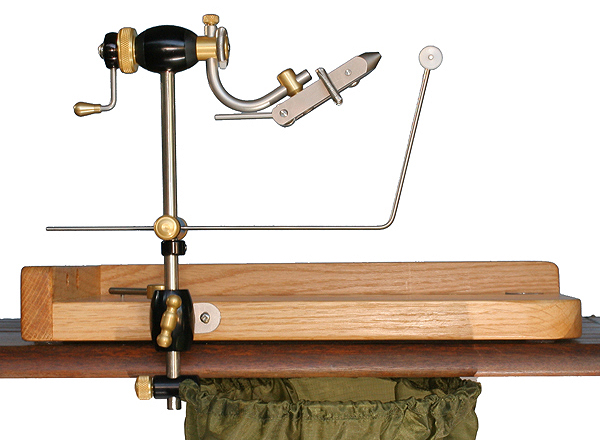
Vice With extension arm and waste basket
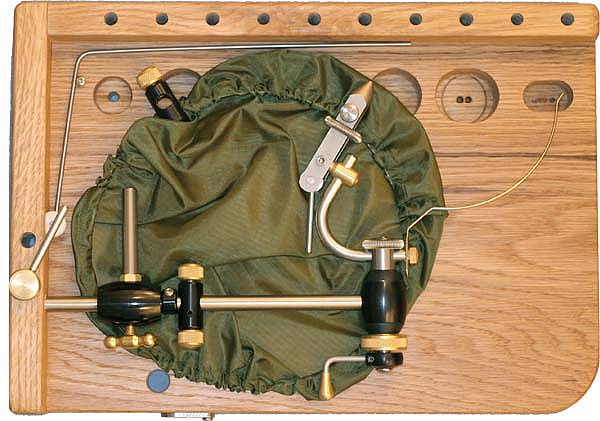
J Vice in Travel Mode